MiA is an app that runs on Microsoft Teams, serving routine yet vital HR tasks. It allows you to complete a number of regular HR tasks such as check In/Out, maintaining timesheets, applying for leave, various requests to HR and more.

The key capabilities of MiA are as follows:

1. Setting-up your MiA

1.1 Steps in setup wizard

(If you are currently using the MiHCM core HR product, please proceed directly to section 1.2.)

Before using the MiA app you are required to conduct some configurations. Once you have signed up for MiA, you will receive a URL which allows you to run the setup wizard, making these configurations simple and easy.

Screens in the setup wizard are as follows:

1. Welcome page

This shows a welcome message and a brief description and some functionalities in MiA. You can enable the necessary features here.

2. Upload employee details

In this step, employee details can be entered individually to the grid or uploaded in bulk format within an excel sheet. Organization relationships (e.g., which departments will fall under which Company) will also be established as a part of uploading employee details. The Excel sheet template used for uploading employee details can be downloaded by pressing the <Download Template> button.

3. Create leave types

In this step, you can define the leave types which will be used by employees when applying for leave. E.g., Annual leave, casual leave etc.

4. License Management

You can define and allocate licenses to the uploaded employees using this step. The licenses allow the usage of MIA for the allocated employees.

5. Leave Balances

Uploading employee leave balances takes place in this step. User is required to enter leave balances in the grid or the Excel sheet for bulk upload

6. Time Zone

The time zone can be set up using the following screen.

7. Summary

The following screen marks the summary of the entire setup wizard.

1.2 Setting Up Outlook Calendar Sync-Up Administrative Permissions

Once you log into your personal portal using the assigned administrative credentials, the next step would be to enable the outlook time zone check in/out and to give in administrative privileges for MIA to access your personal outlook calendars.

Navigate to the Mia integrations as shown below,

The next step is to ensure to give consent by the global outlook administrator of your organisation to affiliate the sync up of calendars.
In order to do this, select “Connect” and login using the Office 365 administrator credentials.

Finally, toggle both options opting in for “Check In/Out” and “Auto Capture Outlook Calendar Events for Work Activity” (To be captured in the Time Sheet), and click “Save”.

1.3 Setting Up Reach HR Notifications

Reach HR notifications are required to be setup to ensure that all HR requests go to the respective people when submitted.

Navigate to the Reach HR page,

Select the organisation structure to apply to a certain organisation level. You may then select a feedback type from the drop-down list, specify a notifying employee to give ownership of the request type to him/her, and then click on “+Add Employee” to finalize the selection.
Escalation employees and the number of days of escalation can also be specified. In order to save the configuration, click “Save” at the bottom of the screen.

1.4 User Management

Using this area, the Admin User can configure licensing and Mia feature rights.

Features

Using the feature rights menu, you can activate/deactivate Mia functionalities for a given user role. As such, it is important to note that employees within a given user role will only have access to the functionalities enabled for that particular user role.

Mia User License

Mia Licenses can be given to the necessary individuals using this page. Licenses may be assigned by simply selecting the required employees, sending them to the assigned employees list and clicking “Save Permission Assignment” upon completion.

2.MiA Functionalities which require administrative configuration

2.1 Upload Pay slips to MiA

One of the capabilities of MiA is to allow employees to view their pay slips via the Microsoft Teams app. In order to enable this experience, you are required to upload employee pay slips using the web-based backend application of MiA, if you have subscribed for it.
To upload your payslips, follow the path Payroll > Payslip File Upload from your main MiHCM Menu, as shown in (A) below.

(A)

Once you are redirected to interface (B) above, select the Slip type as ‘Payslip’ and select the year and month. Pay slips of multiple employees may be uploaded in one go, and they should be named with the employee number of the respective employee.

To view the corresponding End User Experience, go to ‘View payslips using MiA’. (End User- 2.10)

2.2 Compose and disseminate a notice through MiA

Follow the path Setup (Common Setup Area)> Work Details from your main MiHCM Menu (A) to set up this experience:
Once you have selected the above menu option, you will be redirected to the following ‘Configuration Setup’ interface (B). Select Notice Board > Notice Document to proceed.

Once you are directed to interface (B) above, follow the steps below to compose and disseminate a notice through MiA.

  1. Select a ‘Document Name’ and ‘Document Type’ for identification purposes.
  2. Select ‘Always Publish’ or enter a date until which you wish your notice to be published.  
  3. Select the ‘Group’ your notice is required to be sent to.
  4. Select ‘Send E-Mail Notification’ to inform the recipients about the notice by E-Mail as well.
  5. Select ‘Consent Required’ if you wish to gain the receivers consent before sending the notice. (Please note that for security reasons, this feature is only available for notices on the form of a PDF.)
  6. Click and upload / Drag and Drop any documents you wish to attach to the notice using the ‘Upload File’ section. 
  7. Click ‘Save’ to save and disseminate your notice through MiA.


To view the corresponding End User Experience, go to ‘View Notice Board using MiA’. (End User- 2.13)

2.3 Define your Office Spaces

This feature enables you to specify your office locations, facilities and capacity, so that your employees may reserve themselves an office space when necessary. When an employee submits a request to reserve a seat for a particular day, the request may be approved or denied as necessary by the relevant superior (In line with the approval workflow already defined), through his/her own MiA interface.

Follow the path Setup (Common Setup Area) > Work From Office from your main MiHCM Menu to set up this experience

Once you have selected ‘Work From Office’ as indicated above, you will be directed to the following interface within which you may specify your office 1. Location(s), 2. Floor(s) and 3. Area(s).

1. Location(s)
By completing this step, you may define the office locations available for use by your employees.

1. If you wish to edit an existing Location, select the corresponding pencil icon, and edit and save your changes.
2. If you wish to add a new office location, select the ‘Add New’ button to continue.
3. Once you are redirected to the interface above, enter your new office location and click ‘Save’.

2. Floor(s)
In this step you are required to define the floors available at each of the locations you defined in Step 1 above.

1. Once you have completed Step 1 above, select ‘Floor’ from the menu on the left side of your interface to continue.

2. Once you are directed to the interface above, select the corresponding pencil icon to edit an already defined floor.
3. To add a new floor to one of your locations, select ‘Add New’.

4. Once you are directed to the interface above, you may proceed to define your new floor within the corresponding location. Select ‘Save’ to save your changes.

3. Area(s)
In Step 3 you are required to define the specific type of ‘Area’ available, and the ‘Capacity’ it can accommodate for each floor you defined in Step 2 above.

1. Upon completing Step 2 above, select ‘Area’ from the menu on the left side of your interface to continue.

2. Once you are directed to the above interface, you may select the corresponding pencil icon if you wish to edit an already defined ‘Area’.
3. To add a new ‘Area’ select the ‘Add New’ option.

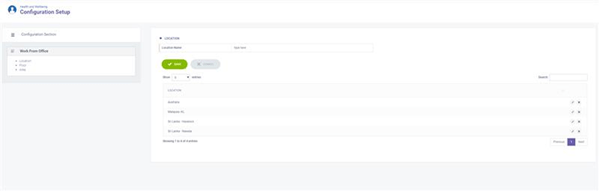
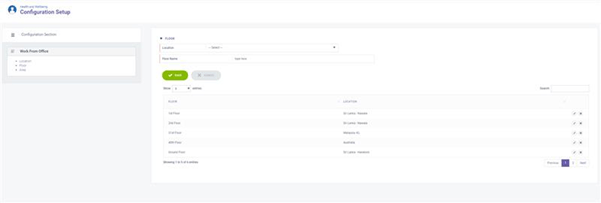
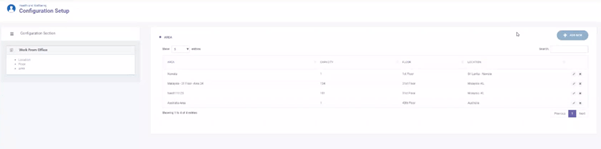
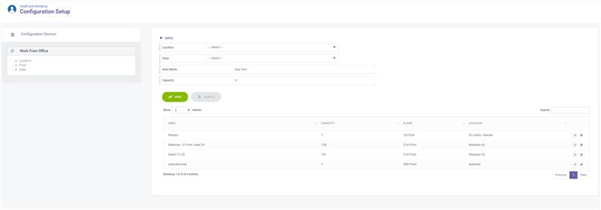
4. You may then proceed to select the relevant ‘Location’ and ‘Floor’ from those previously defined by following Steps 1 and 2. Once you have selected the above, you may proceed to name the new ’Area’ and define the capacity that it is able to accommodate within the interface above. Once you have finished, select ‘Save’ to implement your changes.

Upon completing the above steps, your employees would then be able to request to work from office through MiA. When an employee types in a request to work from office, MiA will check the availability of seats in the particular ‘Area’ on the specified date, and will only accept the request and send it for approval through the workflow if there is an available seat.

To view the corresponding End User Experience, go to ‘Reserve an Office Space using MiA. (End User- 2.14)